3D Print Your Own Terminator, Complete With Red Glowing Eyes

 There’s some scary stuff out there on the Internet – and a lot of it is 3D printable. Instructables is a hive of creative ideas for and by makers of all sorts, and we’ve covered a lot of the more interesting and unusual 3D printing projects. The latest is brought to you by Multi3D, creator of the conductive Electrifi filament. There’s a lot you can do with Electrifi – including creating a 3D printed Terminator head with terrifying red glowing LED eyes in only 11 steps.
Multi3D presents this Instructable in collaboration with their customer Patrick Flowers, who designed an impressive, glowing-eyed Terminator head on Thingiverse and decided to share it on Instructables. For this dual print, you’ll need a dual extruder 3D printer, plus two 5050 red LEDs; Electrifi filament; regular PLA filament; slicing software (Flowers recommends Simplify3D); modeling software; a solder reflow workstation (or a hair dryer); a 3.7-volt lithium polymer battery and charger; JST connectors; two 2mm bolts, washers, and nuts; a wrench or screwdriver; and tweezers or needle-nose pliers.
It’s not exactly a beginner project, but it’s a fun challenge. You can download the necessary files either directly from Instructables or from Thingiverse; once they’re downloaded, open the factory file in Simplify3D or whichever slicing software you choose. There are two separate processes in the factory file: one containing the printing parameters for the black PLA, and one containing the parameters for the Electrifi. For both processes, you’ll need to do a little bit of gcode manipulation, adding a command to allow for cold extrusions; detailed instructions are provided in Step 5 of the Instructable.
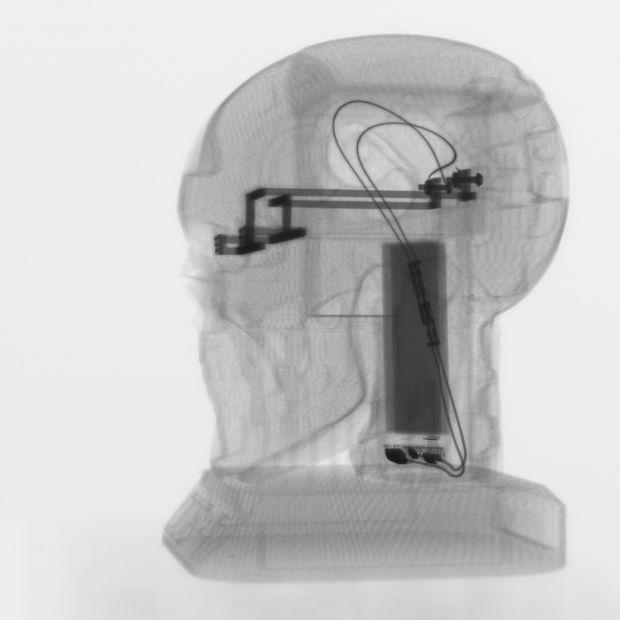 Next, select both processes and click “ok,” then wait for the software to finish slicing your model. Save the gcode to an SD card and load it into your printer. Now it’s time for the fun part – printing the model with an embedded electrical circuit. Flowers recommends using Dglass3D’s AutoLift all-metal hotends to print embedded electronics, as their mechanical retraction technology avoids the cross-contamination issues that tend to plague dual printing. When you’re working with electronics, cross-contamination equals circuits shorting, so you want to be especially careful.
“In my experience it is necessary to use slightly lower printing temperatures with the AutoLift hotends in order to maintain enough downward pressure on the nozzle,” says Flowers. “This keeps the nozzle in its proper printing position. I set the mechanical retraction for these hotends to 0.5 mm. Also, I did not use the S3D prime tower but rather I made my own.”
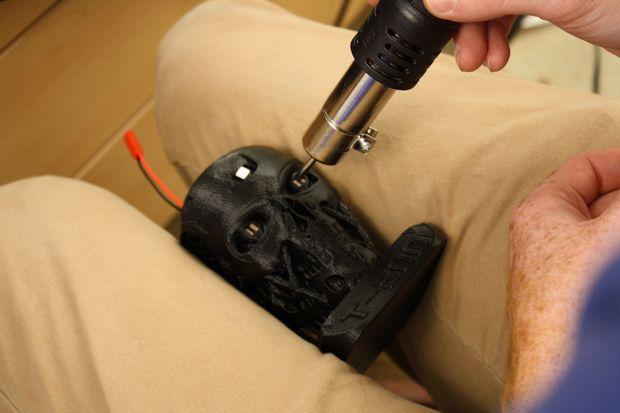
Suggested printing parameters are included in the Instructable. Once your print is finished, it’s time to install the JST connectors. Insert two bolts into the access holes on the back of the PLA model, then fasten the JST connector wire to each screw terminal using washers and nuts. Next, you’ll be installing the LED lights in the eyes. First, soften the Electrifi contact pads by heating them slightly with the solder workflow station (or hair dryer, if you’re in a pinch). With the tweezers or needle-nose pliers, press the LEDs into the softened contacts; the LEDs’ diagonal slits should be facing inward toward the nose of the model. Let the Electrifi cool and harden for 5-10 minutes.
Next, connect your 3.7-volt lithium polymer battery to your JST connector. If the LEDs light up, you’re done, congratulations! If they don’t, you’ll have to troubleshoot a little bit. Make sure your LEDs and JST connector weren’t installed backwards; if they were installed correctly, it’s likely that you have a bad connection between the JST connector and the LEDs. No worries – just heat the area slightly, remove the LEDs, then repeat the installation step, pressing the LEDs more firmly into the Electrifi contact pads.
“Now all you need to do is stuff the battery down in its compartment, place the cap on, and then put it on the mantle or next to the Halloween candy jar,” Flowers concludes. “I hope you enjoy making it as much as I did!”
Think you’re up to the challenge? Check out the video instructions below, and discuss further over in the 3D Printed Terminator Head forum at 3DPB.com.
Subscribe to Our Email Newsletter
Stay up-to-date on all the latest news from the 3D printing industry and receive information and offers from third party vendors.
You May Also Like
3D Printing Unpeeled: New Arkema Material for HP, Saddle and Macro MEMS
A new Arkema material for MJF is said to reduce costs per part by up to 25% and have an 85% reusability ratio. HP 3D HR PA 12 S has been...
3D Printing News Briefs, January 20, 2024: FDM, LPBF, Underwater 3D Printer, Racing, & More
We’re starting off with a process certification in today’s 3D Printing News Briefs, and then moving on to research about solute trapping, laser powder bed fusion, and then moving on...
3D Printing Webinar and Event Roundup: December 3, 2023
We’ve got plenty of events and webinars coming up for you this week! Quickparts is having a Manufacturing Roadshow, America Makes is holding a Member Town Hall, Stratafest makes two...
Formnext 2023 Day Three: Slam Dunk
I’m high—high on trade show. I’ve met numerous new faces and reconnected with old friends, creating an absolutely wonderful atmosphere. The excitement is palpable over several emerging developments. The high...