Formlabs Engineer Models, 3D Prints 1:25 Scale Model of New Apartment

![]() My husband and I moved into our first house about eight years ago, on an abnormally rainy July weekend. Since everything got wet bringing it into the house, all of the furniture was placed on top of old sheets so it could dry without staining the floors. While we sat there, waiting for our tables and chairs and bookcases to dry, we started talking about where we wanted to put everything. Would the couch look better on this wall between the windows, or this one facing the fireplace? Should our wedding picture sit on the mantle, or hang in the study? Formlabs engineer Craig Broady faced a similar conundrum recently, before he moved into a new apartment. He was stymied by the smaller room sizes and awkward wall angles and was trying to determine the best way to arrange everything inside, when a coworker jokingly said he should model and 3D print his apartment in order to figure out furniture placement ahead of time. Thus began a project that occupied him for the next several weeks, as he put together an accurate 1:25 scale model of his future apartment and the furniture he would place inside it, and called “Tiny Town.” (Note: this is not the same as the Tiny House Movement.)
My husband and I moved into our first house about eight years ago, on an abnormally rainy July weekend. Since everything got wet bringing it into the house, all of the furniture was placed on top of old sheets so it could dry without staining the floors. While we sat there, waiting for our tables and chairs and bookcases to dry, we started talking about where we wanted to put everything. Would the couch look better on this wall between the windows, or this one facing the fireplace? Should our wedding picture sit on the mantle, or hang in the study? Formlabs engineer Craig Broady faced a similar conundrum recently, before he moved into a new apartment. He was stymied by the smaller room sizes and awkward wall angles and was trying to determine the best way to arrange everything inside, when a coworker jokingly said he should model and 3D print his apartment in order to figure out furniture placement ahead of time. Thus began a project that occupied him for the next several weeks, as he put together an accurate 1:25 scale model of his future apartment and the furniture he would place inside it, and called “Tiny Town.” (Note: this is not the same as the Tiny House Movement.)

Tiny Town as modeled in Onshape. The walls are modeled in a different part studio.
The first order of business was modeling the space, and he set about measuring everything in the apartment, from the dimensions of the rooms to the locations of radiators, windows, and doors. Broady used cloud-based CAD software Onshape to recreate a layout of the floors and walls in his new apartment in 2D sketches, and then created 1:25 scale drawings which were exported as DXF files. Using one big piece of scrap cardboard (which helped to reduce the amount of glue he would later use), he laser cut the floor and walls.
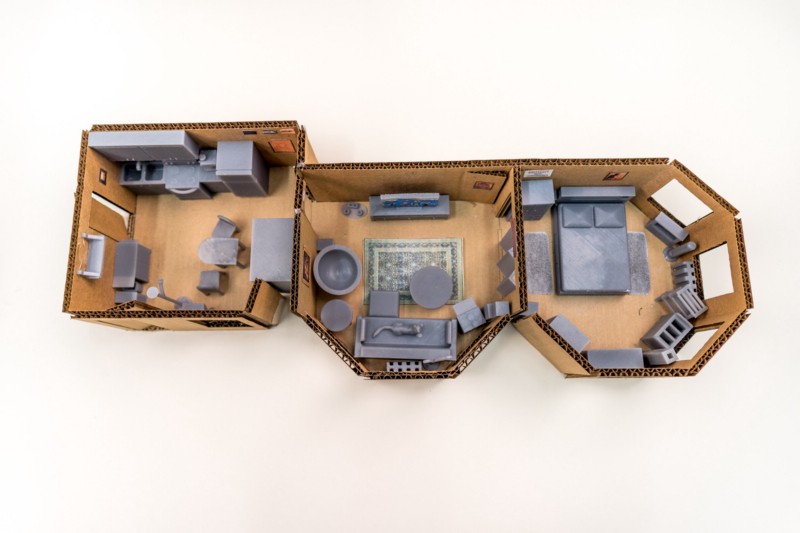
Tiny Town in all its glory.
In his blog post, Broady explained, “Exterior corners are easy to etch using the laser cutter, but interior corners are a bit trickier. Since you can only laser cut one side, you need to denote the location and then make the cut using a hobby knife on the other side. For interior angles, you’ll also need to account for the thickness of the cardboard. If you don’t have a laser cutter, you can also cut the cardboard by hand, using the drawing prints as stencils. Hot glue works well to assemble the walls.”
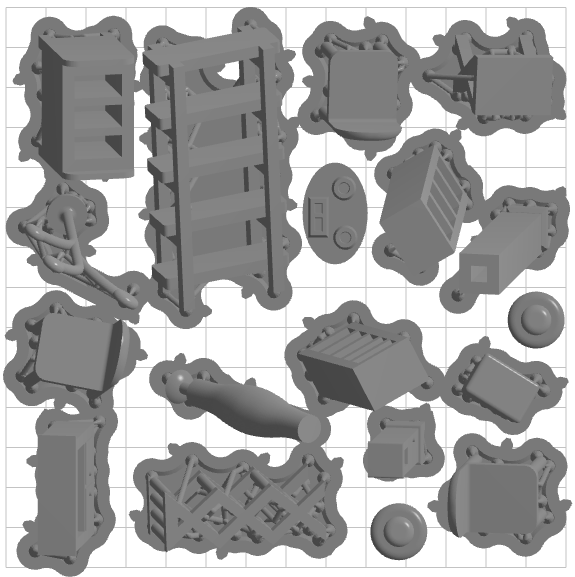
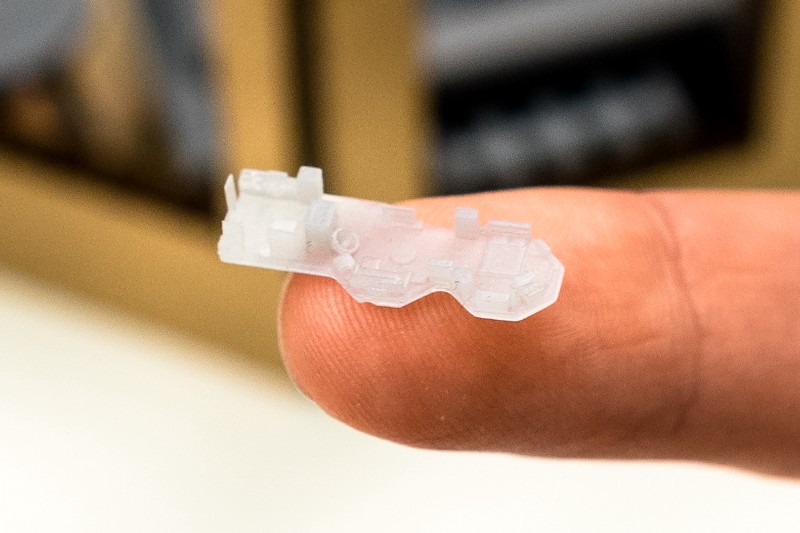
Eighteen parts arranged for printing in PreForm. This job (114mL) prints in ~7 hours using grey resin with 100µm layers.
Then it was time to 3D print the tiny furniture models. Broady admits that using simple boxes would have worked, but that the extra details are what really breathes life into Tiny Town. He measured all of his existing furniture, and then visited vendors’ websites to determine the specific measurements for the furniture he was thinking of purchasing.
He used these measurements to create CAD models, and hollowed the models out, to save time and material, so they had 3-5 mm thick surfaces when they were eventually scaled down for 3D printing. Once he was finished exporting the models as STL files, he imported them into PreForm. He then printed the parts on a Form 2, which can handle small details like knobs, shelves, and door seams.
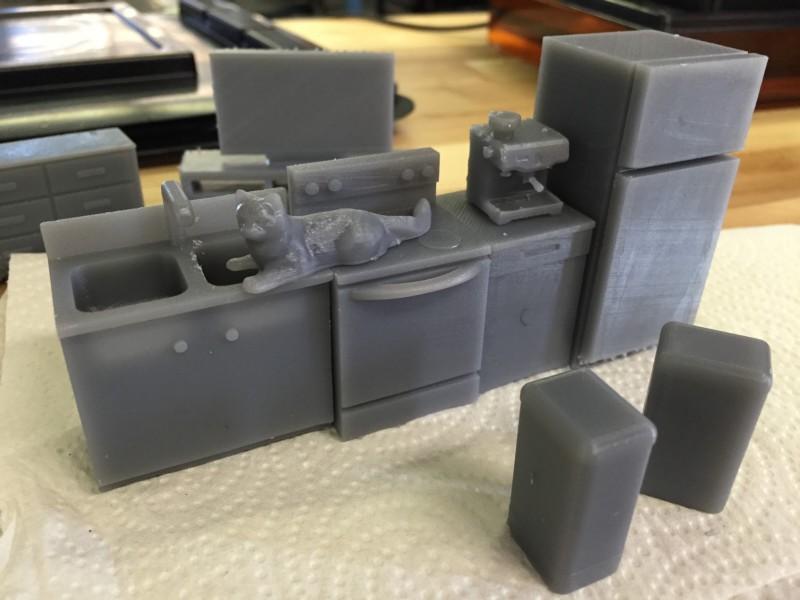
Several printed parts immediately after cleaning and support structure removal.
“While some of the models could be printed flat without support structures, I rotated most of the models by 12º along both the X and Y axes and generated support structures with the default parameters. I tightly packed the build area and used grey resin for all of the furniture for a simple aesthetic,” Broady noted.
He used a regular 2D paper printer to print out all of his artwork and rugs in the same 1:25 scale. Then he could begin the really fun part – arranging everything! Again, Broady conceded that he could have completed this step in less time, with less work involved, in CAD, but that it would have been much less fun. After he played around with several different arrangements (including where the 3D printed Thingiverse model of his cat would most like to nap), he found a layout where everything fit comfortably, and was confident about which furniture to order for his new home.
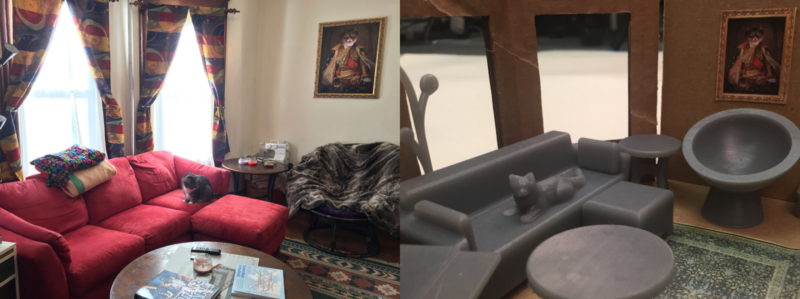
Living room layout. Left: real apartment. Right: Tiny Town
But the story doesn’t end here – many of Broady’s coworkers stopped by his workbench to check out Tiny Town, and offer their feedback, which included asking if he was able to go “one level deeper.” He was intrigued and rationalized that obviously, if he kept Tiny Town in his new apartment, it made sense for him to print a highly detailed 20 x 8 mm Tiny Town for his Tiny Town.
“This sort of print would be one of the rare instances to use 25µm layer height for general purpose resin, resulting in a 158 print,” he said of the tinier-still version of his new home. “The Form 2 performed splendidly, and the Tiny Tiny Town was a success with most of the features resolved.”
Tiny Tiny Town, a 1:125 scale model of the apartment. If I were to go another level smaller, the width of the apartment would be as small as the beam diameter of the Form 2 laser.
Obviously, 3D modeling and printing a 1:25 scale model of your new home is not an option for everyone; Broady says that each print of one dozen items took several hours to print, about 30 minutes to clean, and five minutes to set up. But this fascinating project just illustrates how quickly an idea can become reality using 3D printing, and shows again how 3D printed models can be valuable in interior design applications, where moving tiny 3D printed furniture around scale models can be very handy indeed. Discuss in the 3D Printed Apartment forum at 3DPB.com.
[Source and Images/Captions: Craig Broady/Formlabs]
Subscribe to Our Email Newsletter
Stay up-to-date on all the latest news from the 3D printing industry and receive information and offers from third party vendors.
You May Also Like
3D Printing News Briefs, April 13, 2024: Robotics, Orthotics, & Hypersonics
In 3D Printing News Briefs today, we’re focusing first on robotics, as Carnegie Mellon University’s new Robotics Innovation Center will house several community outreach programs, and Ugogo3D is now working...
Rail Giant Alstom Saves $15M with 3D Printing Automation Software 3D Spark
3D Spark has entered into a three-year deal with the rail giant Alstom. Alstom, a transport behemoth with annual revenues of $16 billion, specializes in the manufacture of trains, trams,...
Meltio Expands Global Reach with New Partnerships in the Americas and Europe
Spanish 3D printing manufacturer Meltio has expanded its sales network across the globe. With the addition of three new partners in the United States, Brazil, Argentina, and Italy, Meltio aims...
3D Printing Webinar and Event Roundup: April 7, 2024
Webinars and events in the 3D printing industry are picking back up this week! Sea-Air-Space is coming to Maryland, and SAE International is sponsoring a 3D Systems webinar about 3D...