SparkFun Project Details How to 3D Print Plastic LED-Filled Modules on Nylon Fabric

 Every engineer and designer knows that experimenting is important when it comes to trying new things – you can’t just expect to ace new skills on the first go. A blogger who goes by Feldi and writes for online retail store SparkFun Electronics, which has been responsible for some neat 3D printed projects in the past, was intrigued by the idea of 3D printing on fabric.
Feldi is interested in wearables and combining crafts with tech, and wanted to give it a shot using LulzBot 3D printers – also the preferred machine of Ryerson University graduate and fashion designer Stephania Stefanakou, who is well-versed in 3D printing on fabric.
“Before we jump in, I want to give credit to my inspiration,” Feldi wrote in a SparkFun blog post detailing the experiment. “There have been tons of similar projects, but most credit for the development of this technique can go to David Shorey, who wrote about his work in Make Magazine. His work definitely piqued my interest, but I really decided to give it a go when I saw this necklace on imgur. I loved the idea of not only using this to make a scaling malleable surface, but also to create a visual floating effect against the skin.”
Feldi broke down the process into a step-by-step format, starting with making or downloading a model and preparing the g-code, and then starting the print. After the first two or three layers are finished, pause the print and move the Z-axis up manually before stretching the fabric very taut over the 3D printed materials.

“If the nozzle even grazes the fabric, it will burn a massive hole and basically ruin your entire print. I lost a lot of good fabric to the nozzle drag, which brings me to my third lesson: Don’t bring the Z-axis back down to its original position, but rather one notch above where it had been. The melted extruded plastic will still stick to the layers below and you won’t risk burning your fabric as much with that extra space.”
Feldi started off with a simple design for a floating bracelet as a test, and successfully used tiny magnets for the clasp. After this first success, the blogger created a model with several whimsical floating stars, which proved more than a little frustrating.
“It turns out that their sharp angles were having a hard time sticking to the print bed,” Feldi explained. “When the nozzle made a sharp turn, it would start to pick up the filament it had just laid down with it, making a big mess of melted plastic.”
 Feldi powered through, and after nearly 30 tries, managed to 3D print a simpler version of the original idea. But the blogger knew this was not the way to go, recognizing that any 3D printed shapes needed to be more simple, so they could better adhere to the print bed. Feldi also wondered if it would be possible to 3D print some circular modules and add a simple, pulsing LED.
“I decided that if I included some electronics, each module should be self contained as to avoid shattering the illusion of floating object with wires or conductive thread,” Feldi wrote.
First, it was determined roughly how much space a simple circuit and battery might take up, and then Feldi began 3D printing a preliminary module design. But the blogger immediately noticed that the delicate nylon fabric being used would not be able to hold up well under “a super bulky module.”

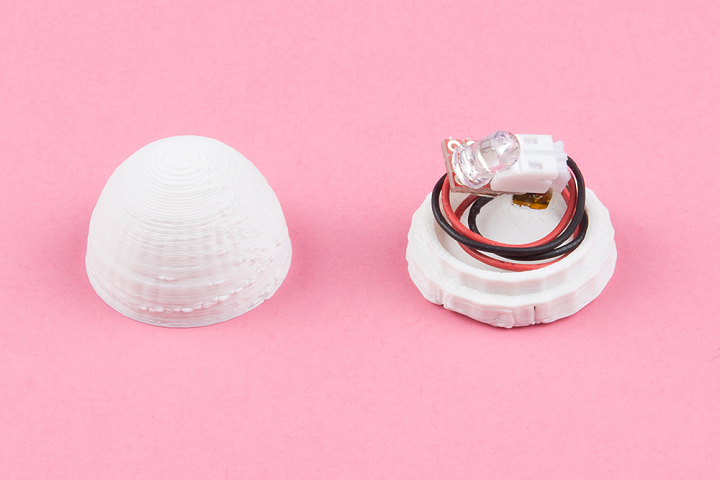
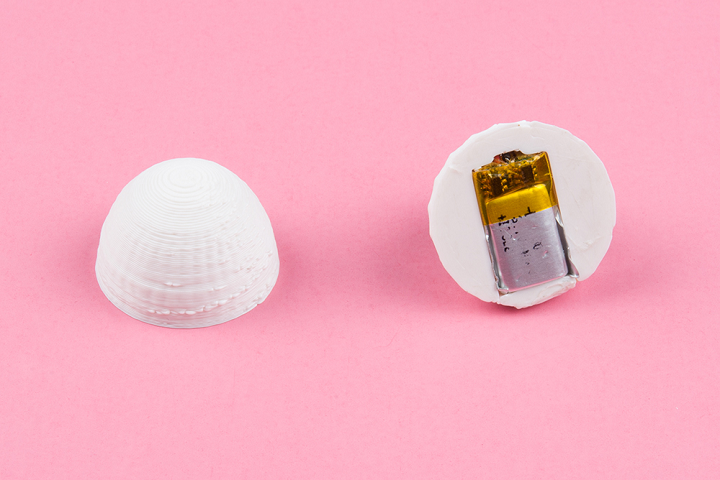
Feldi attempted to reduce the size by using a flat LilyPad LED instead of the larger, super-bright one, but it wasn’t bright enough. In order to lower the circuit height without losing any brightness, Feldi decided to forget about the pulsing LED, and just used an LED, battery, resister under a protoboard, and a JST connector to “make the smallest circuit possible.”
 Feldi first completed several design versions off of the fabric, so as not to waste it.
“I probably went through about 10 iterations before I finalized my design,” Feldi said. “In a few cases I made my walls too thin, and in some too thick. I initially planned to use magnets to secure the two parts of a module, but this meant making the walls a lot thicker than I wanted too.”
Two parts, a base and a cap, made up the module, so the electronics would fit inside. The design used pressure to hold the pieces together, and the battery fit in the base for space-saving purposes.
“Once I nailed everything down as a free-standing module, I moved on to print on fabric. With all the practice from my previous experiments, I was able to execute a few clean fabric prints pretty quickly. The final result of several electronics modules on fabric looks pretty ok, but I think could be refined a lot more.”

Feldi learned a lot, but thinks more time is needed to figure out the electronics a little more. The next iteration may even need some custom PCB design, which the blogger thinks is “a good next step.”
Discuss this story and other 3D printing topics at 3DPrintBoard.com or share your thoughts below.
[Images: SparkFun]
Subscribe to Our Email Newsletter
Stay up-to-date on all the latest news from the 3D printing industry and receive information and offers from third party vendors.
You May Also Like
Gorilla Sports GE’s First 3D Printed Titanium Cast
How do you help a gorilla with a broken arm? Sounds like the start of a bad joke a zookeeper might tell, but it’s an actual dilemma recently faced by...
Nylon 3D Printed Parts Made More Functional with Coatings & Colors
Parts 3D printed from polyamide (PA, Nylon) 12 using powder bed fusion (PBF) are a mainstay in the additive manufacturing (AM) industry. While post-finishing processes have improved the porosity of...
$25M to Back Sintavia’s Largest Expansion of Metal 3D Printing Capacity Since 2019
Sintavia, the digital manufacturing company specializing in mission-critical parts for strategic sectors, announced a $25 million investment to increase its production capacity, the largest expansion to its operations since 2019....
Velo3D Initiates Public Offering in a Bid to Strengthen Financial Foundations and Drive Future Growth
Velo3D (NYSE: VLD) has been among a number of publicly traded 3D printing firms that have attempted to weather the current macroeconomic climate. After posting a challenging financial report for 2023,...